Now that we have an application shell and we are rendering a basic scene, let’s get down to rendering our sheet of graph paper! There are several approaches we can take to rendering a grid onto a mesh. One of the most simple would be to create a texture in an image editor and skin it onto our mesh. Tried and true, this method would work great! But… I have no interest in opening an image editor to create a grid texture. Shaders offer an alternative solution to solve this problem, though a good solution that looks nice is actually a rather complex subject. Read all about it in this wonderful post “The Best Darn Grid Shader (Yet)”. Seriously, if you want to render beautiful grids with shaders, you should read that post, you’ll also learn a ton about how fragment shaders work. If you don’t want to read through the whole article, I’ve taken the Unity shader code and converted it to a WGSL fragment shader that integrates with the Bevy physically-based rendering (PBR) pipeline. So follow along, and let’s get to rendering some graph paper! At the end of this post, we’ll be able to render all the graph paper we want onto any mesh we want.
Bevy Custom Materials
The first thing we need to do is create our own custom material that we can use to render meshes. Because we want to integrate light sources, textures, and other elements of the PBR, we’ll be implementing something called a MaterialExtension. The MaterialExtension trait allows us to extend a StandardMaterial from the PBR pipeline and add our own uniforms and data to it. For this post, we will be adding three uniforms to the StandardMaterial: line color, line width, and subdivisions for drawing our grid.
// Update use statements at top of file
usebevy::{pbr::{ExtendedMaterial,MaterialExtension},prelude::*,render::{mesh::Indices,render_resource::{AsBindGroup,PrimitiveTopology,ShaderRef},},};...// Add our custom GridMaterial to the plugin system
implPluginforTextGem{fnbuild(&self,app: &mutApp){letmutmaterial_plugin=MaterialPlugin::<ExtendedMaterial<StandardMaterial,GridMaterial>>::default();material_plugin.prepass_enabled=false;app.add_plugins(material_plugin).add_systems(Startup,Self::hello_world).add_systems(Startup,Self::startup);}}...// Remove the Cube from the scene and render a Plane instead
implTextGem{fnstartup(mutcommands: Commands,mutmeshes: ResMut<Assets<Mesh>>,mutgrid_materials: ResMut<Assets<ExtendedMaterial<StandardMaterial,GridMaterial>>>,){// Camera
commands.spawn(Camera3dBundle{transform: Transform::from_xyz(300.0,100.0,300.0).looking_at(Vec3::new(0.0,0.0,0.0),Vec3::Y),..default()});...// Graph Paper
commands.spawn(MaterialMeshBundle{mesh: meshes.add(shape::Plane::from_size(350.0).into()),material: grid_materials.add(ExtendedMaterial{base: Color::BLUE.into(),extension: GridMaterial{color: Color::ORANGE,subdivisions: UVec2::new(0,0),line_widths: Vec2::new(0.01,0.01),},}),..Default::default()});}}...// Add new GridMaterial
#[derive(Asset, TypePath, AsBindGroup, Debug, Clone)]pubstructGridMaterial{#[uniform(100)]color: Color,#[uniform(101)]subdivisions: UVec2,#[uniform(102)]line_widths: Vec2,}implMaterialExtensionforGridMaterial{fnfragment_shader()-> ShaderRef{"grid_material.wgsl".into()}}
Grid Fragment Shader
Next we’ll need to create the grid_material.wgsl shader that we reference from our custom material. This is a fragment shader that will integrate with the existing PBR pipeline AND allow us to draw grid lines over a mesh.
#importbevy_pbr::{pbr_fragment::pbr_input_from_standard_material,pbr_functions::alpha_discard,}#ifdefPREPASS_PIPELINE#importbevy_pbr::{prepass_io::{VertexOutput,FragmentOutput},pbr_deferred_functions::deferred_output,}#else#importbevy_pbr::{forward_io::{VertexOutput,FragmentOutput},pbr_functions::{apply_pbr_lighting,main_pass_post_lighting_processing},}#endif@group(1)@binding(100)var<uniform>grid_color:vec4<f32>;@group(1)@binding(101)var<uniform>grid_subdivisions:vec2<u32>;@group(1)@binding(102)var<uniform>grid_line_widths:vec2<f32>;fnsample_grid(uv:vec2<f32>)->f32{// Allows for further subdividing between UV coordinates
letgrid_subdivisions_f32:vec2<f32>=vec2<f32>(f32(grid_subdivisions.x)+1.0,f32(grid_subdivisions.y)+1.0);varmulti_uv=uv*grid_subdivisions_f32;// Make sure line width is between 0.0 and 1.0
letline_widths=saturate(grid_line_widths);// difference of UV values between adjacent screen fragments
letuv_ddxy=vec4<f32>(dpdx(multi_uv),dpdy(multi_uv));// some distance calculation eventually used in antialiasing
letuv_deriv=vec2<f32>(length(uv_ddxy.xz),length(uv_ddxy.yw));// if the line_width is more than half the space provided for drawing it,
// it's really the background then isn't it?
letinvert_line=line_widths>0.5;// select the appropriate line_width based on how large it is
lettarget_width=select(line_widths,1.0-line_widths,invert_line);// we want to draw at least the size of the derivative calculation, and at most
// half the available space to draw the line
letdraw_width=clamp(target_width,uv_deriv,vec2<f32>(0.5,0.5));// scale the derivative for antialiasing
letline_aa=uv_deriv*1.5;// these steps are magical
vargrid_uv=abs(fract(multi_uv)*2.0-1.0);grid_uv=select(1.0-grid_uv,grid_uv,invert_line);vargrid2=smoothstep(draw_width+line_aa,draw_width-line_aa,grid_uv);grid2*=saturate(target_width/draw_width);grid2=mix(grid2,target_width,saturate(uv_deriv*2.0-1.0));grid2=select(grid2,1.0-grid2,invert_line);// mix the x and y value to draw it if either x or y needs drawing
returnmix(grid2.x,1.0,grid2.y);}@fragmentfnfragment(in:VertexOutput,@builtin(front_facing)is_front:bool,)->FragmentOutput{// generate a PbrInput struct from the StandardMaterial bindings
varpbr_input=pbr_input_from_standard_material(in,is_front);// alpha discard
pbr_input.material.base_color=alpha_discard(pbr_input.material,pbr_input.material.base_color);// mix the grid color into base color
letgrid_mix=sample_grid(in.uv);pbr_input.material.base_color=mix(pbr_input.material.base_color,grid_color,grid_mix*grid_color[3]);#ifdefPREPASS_PIPELINE// in deferred mode we can't modify anything after that, as lighting is run in a separate fullscreen shader.
letout=deferred_output(in,pbr_input);#elsevarout:FragmentOutput;// apply lighting
out.color=apply_pbr_lighting(pbr_input);// apply in-shader post processing (fog, alpha-premultiply, and also tonemapping, debanding if the camera is non-hdr)
// note this does not include fullscreen postprocessing effects like bloom.
out.color=main_pass_post_lighting_processing(pbr_input,out.color);#endifreturnout;}
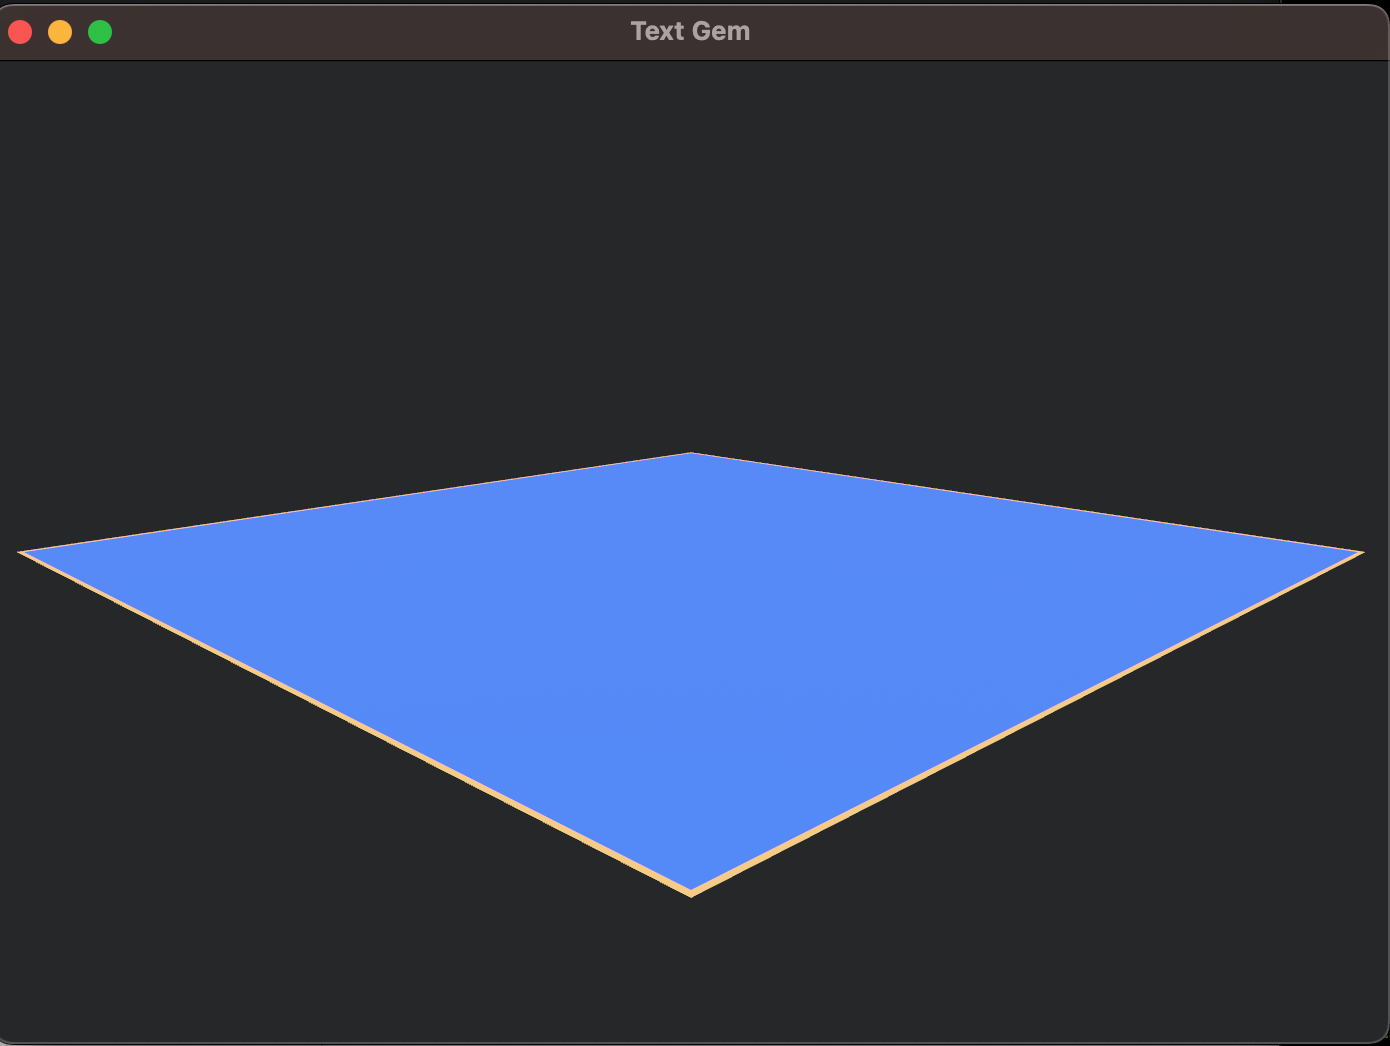
If we run our application with cargo run, we should now see a plane rendered with a border around it. It will look something like this.
This is pretty close, but we are trying to render a grid, not a border! There are now two ways that we can render the grid: increase the value of subdivisions on our GridMaterial or create a new mesh with the correct UV coordinates to render the grid using our shader. Let’s take a look at both approaches and see that they give us pretty much the same result.
Increase Subdivisions
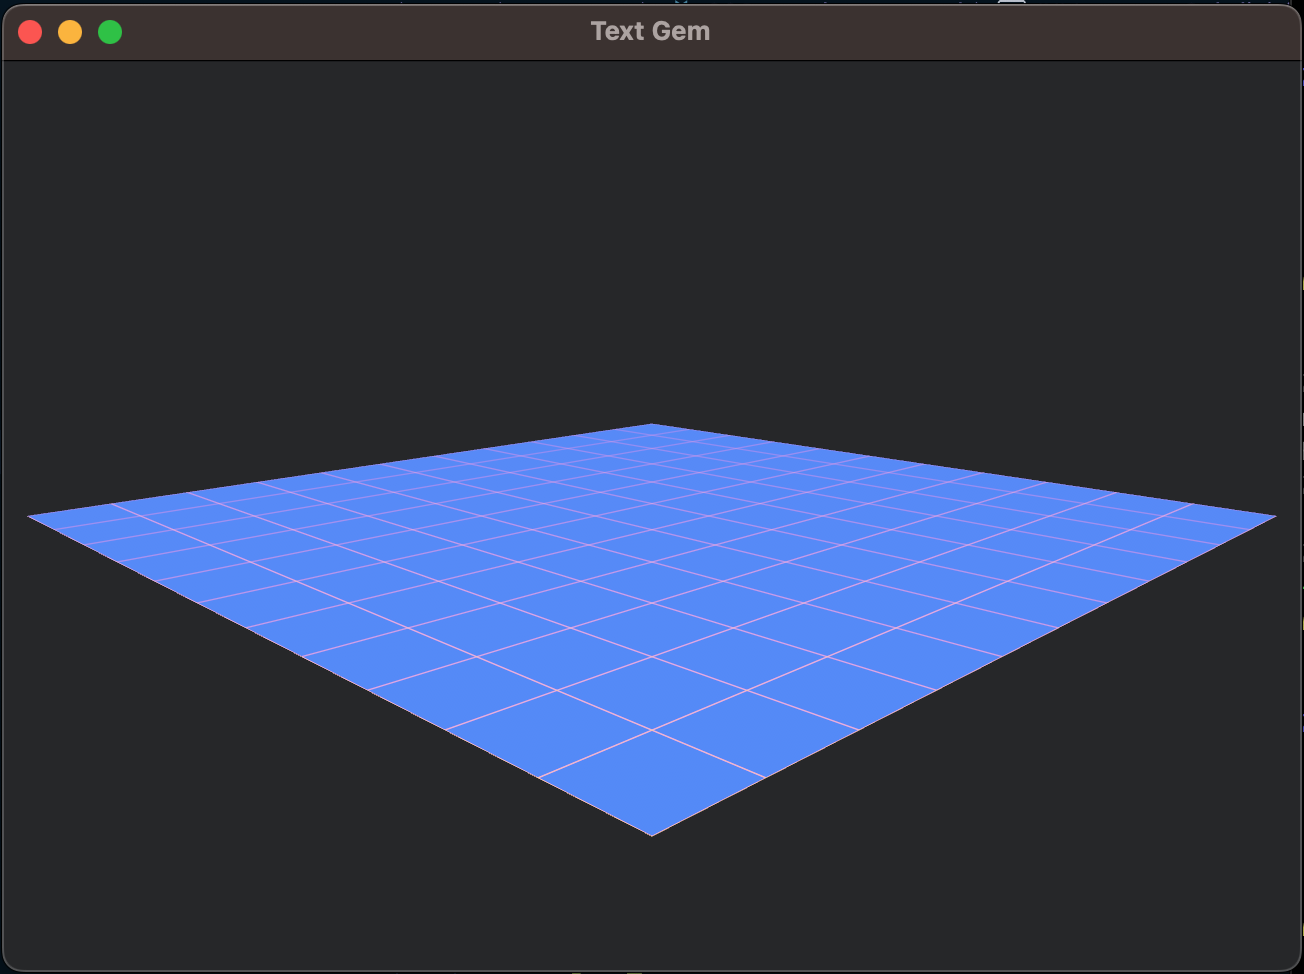
First we’ll try increasing the subdivisions parameter on GridMaterial. This will cause the shader to divide the space between UV coordinates using the number of subdivisions we specify.
// Update our startup function
implTextGem{fnstartup(mutcommands: Commands,mutmeshes: ResMut<Assets<Mesh>>,mutgrid_materials: ResMut<Assets<ExtendedMaterial<StandardMaterial,GridMaterial>>>,){...// Graph Paper
commands.spawn(MaterialMeshBundle{mesh: meshes.add(shape::Plane::from_size(350.0).into()),material: grid_materials.add(ExtendedMaterial{base: Color::BLUE.into(),extension: GridMaterial{color: Color::ORANGE,subdivisions: UVec2::new(10,10),line_widths: Vec2::new(0.01,0.01),},}),..Default::default()});...}}
Now when executing cargo run we should see the following image.
UV Coordinate Grid
Instead of using the shader to subdivide our grid, let’s add UV coordinates to our mesh. Alternating UV coordinates between 0 and 1 will cause the shader to draw lines at values 0 and 1. In order to create our mesh, we’ll need to create our own method of converting a Plane into a Mesh with the desired UV coordinates.
// Render a GridPlane instead of a Plane
implTextGem{fnstartup(mutcommands: Commands,mutmeshes: ResMut<Assets<Mesh>>,mutgrid_materials: ResMut<Assets<ExtendedMaterial<StandardMaterial,GridMaterial>>>,){...// Graph Paper
commands.spawn(MaterialMeshBundle{mesh: meshes.add(GridPlane(shape::Plane{size: 350.0,subdivisions: 10,}).into(),),material: grid_materials.add(ExtendedMaterial{base: Color::BLUE.into(),extension: GridMaterial{color: Color::ORANGE,subdivisions: UVec2::new(0,0),line_widths: Vec2::new(0.01,0.01),},}),..Default::default()});...}}...pubstructGridPlane(shape::Plane);implFrom<GridPlane>forMesh{fnfrom(value: GridPlane)-> Self{letplane=value.0;// here this is split in the z and x directions if one ever needs asymmetrical subdivision
// two Plane struct fields would need to be added instead of the single subdivisions field
letz_vertex_count=plane.subdivisions+2;letx_vertex_count=plane.subdivisions+2;letnum_vertices=(z_vertex_count*x_vertex_count)asusize;letnum_indices=((z_vertex_count-1)*(x_vertex_count-1)*6)asusize;letup=Vec3::Y.to_array();letmutpositions: Vec<[f32;3]>=Vec::with_capacity(num_vertices);letmutnormals: Vec<[f32;3]>=Vec::with_capacity(num_vertices);letmutuvs: Vec<[f32;2]>=Vec::with_capacity(num_vertices);letmutindices: Vec<u32>=Vec::with_capacity(num_indices);forzin0..z_vertex_count{forxin0..x_vertex_count{lettx=xasf32/(x_vertex_count-1)asf32;lettz=zasf32/(z_vertex_count-1)asf32;letux=(x%2)asf32;letuz=(z%2)asf32;positions.push([(-0.5+tx)*plane.size,0.0,(-0.5+tz)*plane.size]);normals.push(up);uvs.push([ux,uz]);}}forzin0..z_vertex_count-1{forxin0..x_vertex_count-1{letquad=z*x_vertex_count+x;indices.push(quad+x_vertex_count+1);indices.push(quad+1);indices.push(quad+x_vertex_count);indices.push(quad);indices.push(quad+x_vertex_count);indices.push(quad+1);}}Mesh::new(PrimitiveTopology::TriangleList).with_indices(Some(Indices::U32(indices))).with_inserted_attribute(Mesh::ATTRIBUTE_POSITION,positions).with_inserted_attribute(Mesh::ATTRIBUTE_NORMAL,normals).with_inserted_attribute(Mesh::ATTRIBUTE_UV_0,uvs)}}
Run the application again using cargo run and we should get the same output as setting subdivisions in the shader.
Next Up…
We now have a way to render graph paper and control the line sizing, coloring, and division of the plane. Next we’ll render 3d meshes using our shader as well as much larger grids.
Full code for this post can be found here: TextGem Post 2.